MAKE A DMX TESTER.
DMX512 is an electrical and data standard for the control of lighting in the entertainment industry. It allows up to 512 dimmers to be controlled through a single thin data cable, and is also used to control intelligent lights that use groups of channels to control things like mirror position, colour, gobo (image), effects and intensity.
When DMX works it's absolutely great, but when it doesn't work it's absolutely terrible, since the dimmers and moving lights can suddenly take on a life of their own, which can be a bit awkward (not to mention embarassing) if you're in the middle of a show!
This is a useful little keychain-sized device that can visually display the presence and polarity of data on a DMX lighting control network. It won't prove that the data is valid, and it won't detect glitches or signal echo's, but it's still very useful.

Here are the schematics of the standard DMX terminators and the test units. Although the DMX standard specifies a 5-pin XLR connector, many cheap lighting units use 3-pin connectors for economy and to allow the use of standard microphone style leads which are actually taboo for professional installations.
Some older equipment, most notably that manufactured by Martin Lighting actually reverses the data polarity (pins 2+3) which is a bit of a c*nt.
The terminators consist of a single 120 ohm resistor soldered across pins 2+3, and one of these should be put at the end of a network as standard to reduce the possibility of signal reflections bouncing back down the data line and possibly corrupting the data. The resistor should ideally be rated at half a watt.
The tester is similar, but instead of the termination resistor, it splits the current through a resistor and a circuit with either a bi-colour LED or two individual LEDs wired in inverse parallel with a current limiting resistor in series. The tester only really requires the resistor in series with the LED/s to operate, but the additional resistor across pins 2+3 allows the tester to double up as a rough terminator.
Most testers like this just use a standard red/green LED, but using two separate LEDs gives the option of using much brighter LEDs or even using different colours like blue, white, purple, pink, turquoise or high output green.
Because of the polarity reversal according to the data being transmitted, the LED/s will either show one colour or the other at any given time. However, the data transmission rate is so high that the colours tend to merge and give a resultant colour that is biased towards the most prominent data polarity. This can be used as a polarity check, since if the lighting desk is set to output all channels at zero, then there will be a different colour bias from having all channels set at full.
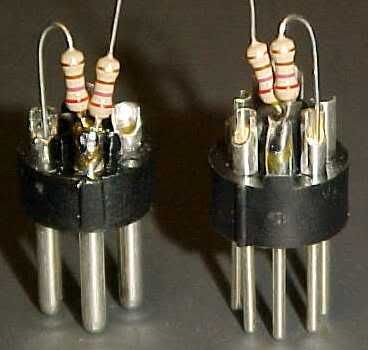
It's easiest to solder the two 270 ohm resistors into pin 3 first.
Because the resistors are higher value, they can be quarter watt devices.

Then pop the end of one resistor straight into pin two along with one of the LED leads (or two if using a pair), then solder the remaining LED lead/s to the top of the other resistor.
Remember that if you are using two LEDs, then they should be connected in inverse parallel.
Also take care to ensure that the LED's don't protrude too high, since you will be potting the lot in resin.
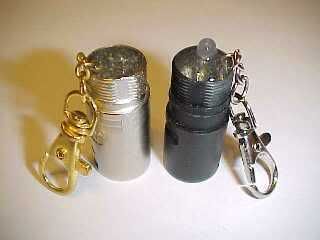
The inserts are pushed into their shells and after checking that the components are clear of the shell, encapsulated with two part resin, adding an optional keychain if desired.
An interesting effect with the resin is the way it cancels the refractive index of the LED lenses that makes them normally look so focused... When encapsulated, the lenses seem to disappear and you just see the sharp pinpoints of light from the LED chips.

Then just plug it into your nearest DMX outlet and watch the blinky lights. They should flicker with a bias towards one of the colours that depends on the ratio of ones to zeros in the data being transmitted.
Theoretically the use of the higher voltage LED's like the blue one in the picture above, could cause the LED to light very dimly or not at all if the network was heavily loaded down.
If the tester is not going to be used as a terminator, then the shunt resistor across pins 2+3 can be omitted, making the unit simpler to construct and allowing the network voltage to float a little higher.