HOW TO USE A TRACKER TO FIND WANDERING FAMILY MEMBERS.
I'm writing and putting this page up in 2013, so depending on when you're reading this it may be out of date if better technology has appeared. At the very least it will act as a starting point in helping you learn about setting up a tracker.
This information page came about as a result of my mother developing Alzheimers (dementia) and what started off as harmless walks suddenly turned rather scary when she got lost. After two of these incidents which involved the police we decided we had to do something to track her whereabouts because we were afraid that if she triggered too many searches then they might force us to put her in a care home (The trendy new name for secure mental asylums.)
I started doing some research on trackers and ended up buying a few different types to try them out. We tried a super expensive proprietary one and we tried cheapo ebay ones, and the good news is that the cheapo ebay ones are absolutely the best!
Here's a guide to getting and setting up a tracker (or two) to help others in the same situation find the absolutely indescribable relief that being able to pinpoint a wandering family member gives when they go off on one of their missions.
To start with it's worth mentioning that this will be much easier if one of your family members has a modern Android or iPhone device. You don't absolutely need one, but they work very well with trackers. Keep in mind that the cost of a proprietary tracker is much more than the latest state of the art smartphone too! If you're not comfortable with technology then find a relative who is so you can call them when you need to locate the tracker. Most geeks will find it quite a pleasing gadget anyway.
Many trackers claim a battery life of a couple of days, but in reality you should either charge the tracker every night or swap the battery in the morning. Trust me, you don't want a flat battery when you need to try and find the person wearing the tracker!

Here's the first one we tried. A Keruve system which cost over £1000 and was supplied as a handheld locator unit and a lockable watch. This is a Spanish system and you can either send them a couple of SIMs to fit into it or they can fit it with SIMs for your part of the world.
And this is where it all went wrong! We live on the Isle of Man which despite sharing the same international code as the UK pretends it is an international destination incurring high roaming rates for UK registered SIMs. We sent Keruve two SIMs for an Isle of Man telephone network operator and they had problems with them and ended up fitting standard UK ones instead. The system is pretty much a closed shop so once they have set it up with the supplied SIMS you cant change anything or swap in different SIMs. Aside from this the unit would often simply not get a location, and when the receiver unit just stopped communicating completely we had to use the watch on its own in conjunction with a smartphone where the unit would respond with a link to the Keruve website which either gave a map location or just an error message!
In short, the Keruve was a disaster for us. It was harder to use, more expensive and less reliable than the cheap ebay units.
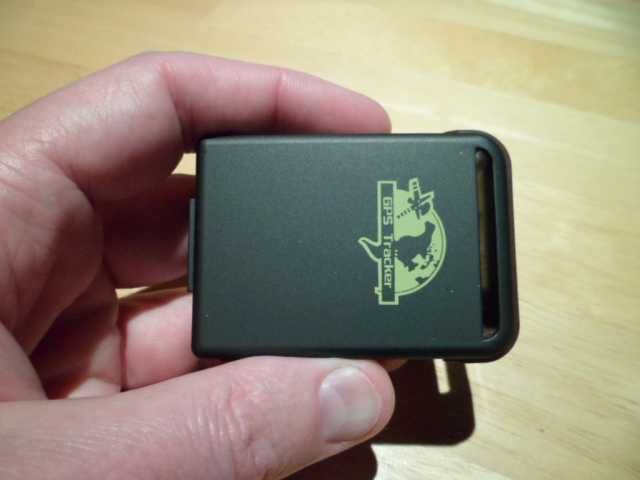
This is a mass produced generic tracker called a TK102. Ebay is absolutely awash with either original or copied TK102 trackers that seem to originate from a company called Xexun. The price has progressively come down over time to the point that right now as I write this in 2013 the price is about £40. It is without a doubt the easiest to use tracker with good reliability and a price point where you can afford to buy complete spare units as backup.
It uses a standard SIM and standard Nokia batteries and you can either use it with a plain mobile phone and computer or a smartphone like an Android or iPhone.
With any mass copied product there will inevitably be good and bad ones, but at the price you can buy a couple from different sellers and try them out.
I recommend buying one from a seller in your country. It'll probably cost a bit more, but delivery will be faster and it's easier to resolve any purchasing issues.

Trackers require a SIM (Subscriber Identity Module) which is a little chip that you get from your local phone supplier that gives the tracker access to their network and a phone number. You can buy a PAYG (Pay As You Go) SIM with suitable credit £10 / £20 or whatever you wish. Note that it should be compatible with a 2G network which applies to most networks, but I don't think it would work with "3" in the UK as they were built up on a 3G network. In the UK you could probably use O2, Orange, T-mobile or Vodaphone. Here on the Isle of Man I chose "Sure" as they had the best signal in our area. We also both have phones on the Sure network which assists in setting up the SIM before it is inserted into the tracker.
Trackers use SMS (Short Message Service) "texts" to communicate so they don't use much credit. A top-up of £20 should last a good length of time.
TK102 trackers use a "standard" size SIM.
You may need to turn off the password protection on the SIM as the trackers don't have a facility for that and will simply not work if the SIM is password protected. Many SIMs come with their password enabled and set to something like 0000 (four zeroes) but your provider will have included the password information in the little booklet that comes with your SIM. To check if your SIM is password protected you will need to put it into a suitable mobile phone on the same network (that can take a standard sized SIM) and see if it asks for the SIM password on power up. If it does then go to the settings in the phone and find the bit that lets you turn the SIM password off. It usually asks you to confirm by typing in the password one last time. Double check that the phone does not ask for the SIM password when it is turned off and on again.
You will also have to turn off the voicemail facility if it is enabled. Some providers allow you to do this by sending a code from your phone, while others expect you to call up their customer service to do it. Here on the Isle of Man on the Sure network there were two different codes for turning off different types of voicemail so I just dialled them both. One was ##21# and the other was ##004# You dial the number and press call, whereupon it responds with a confirmation message. Note that these numbers are for "Sure" and may not be compatible with other providers. You can usually find the codes on their website or by asking in one of their shops. If in doubt phone the customer service number while the SIM is in your phone and ask if they can turn off voicemail completely.
To make sure that voicemail is turned off simply turn the phone off and see what happens when you try to call the SIMs number. It should try contacting it for a while and then announce that it can't be reached but NOT let you leave a voicemail message.
Once you've prepared the SIM it can be removed from the phone and put into the tracker. The SIM is usually held in place in the tracker by a little metal clip that slides to the side and hinges up. Some use a guide that you slide the SIM under, and some have little channels in the hinge-up lid that you slide the SIM into before closing it down. In the tracker shown above you slide the metal holder to the side so it clicks and then swings up. You place the SIM in making sure that its gold plated contacts mate with the contacts in the tracker, and then you hinge the plate gently down and click it to the side to lock it. Note that there is a chamfered corner on the SIM with matching angled corner in the holder to ensure correct alignment. If the lid refuses to close then check that it's not the type where you slide the SIM into the lid itself. If in doubt consult your resident geek.
For setting up the SIM, checking its credit and other "housekeeping tasks" it may be useful to get a cheap basic phone from the same provider you get the SIM from. You could even get it as a pay as you go package with the SIM. It doesn't have to be too special to do what's required, in fact the simpler the better.
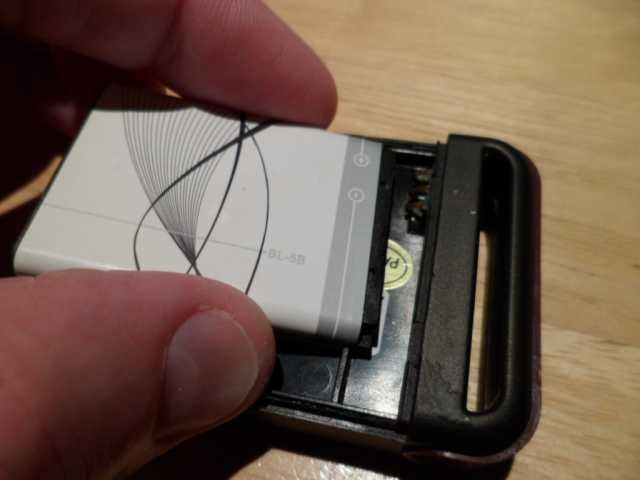
All the TK102 trackers I've bought came with absolutely standard Nokia compatible BL-5B lithium batteries. This means you can get spares easily on ebay.
What happens when you put the battery in will depend on the version of software in the tracker. Some power-up automatically after a short delay while others require you to press and hold the power button for a few seconds to make them start up. Either way, operation will usually be indicated by a small LED on the side of the tracker blinking. Note that there are two buttons. One is a power button and the other is an SOS button that sends a text message to a number you can program into it. I actually used a Dremel to grind the SOS button flush to stop my mum pressing it accidentally while fumbling with the unit. You may or may not find that necessary. My mum tends to wear her tracker to bed with her and I was concerned that she might lie on it during the night and send us loads of SOS text messages. The original software appears to have had the incredibly annoying feature of sending continuous SOS messages until a stop code is sent, but I think they've changed that to a single message in later versions.
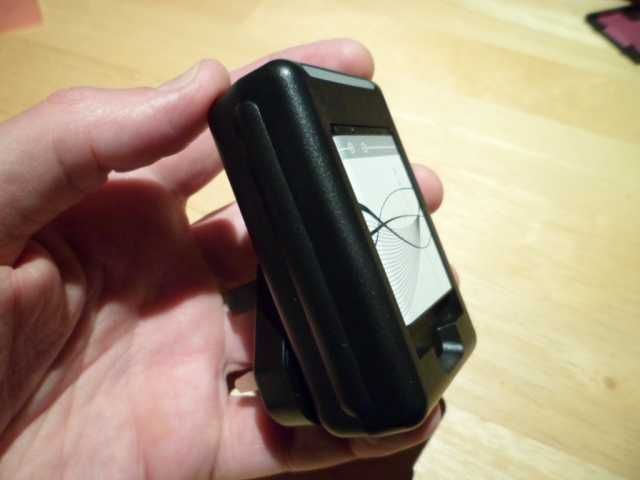
Although the units come with a USB charging lead and sometimes a charger too, both me and my brother found the best way to deal with battery charging was to have two or more batteries and use a plug-in wall charger to charge them. It means that every morning we just take the used battery out of the tracker and pop it straight into the charger, putting the already charged one into the tracker.
Being standard BL-5B batteries, chargers are widely available as these are used in many products.
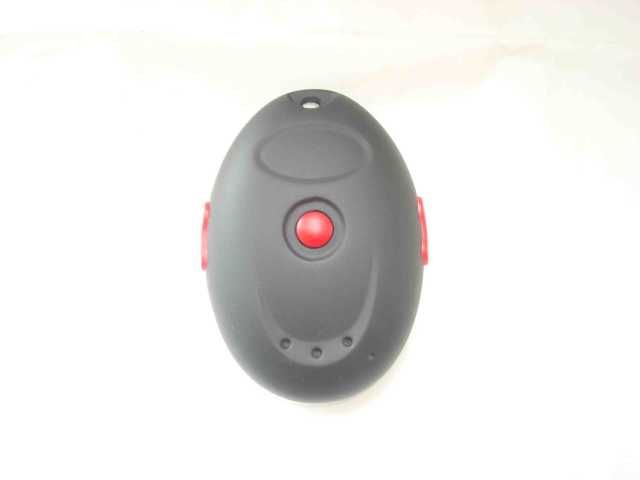
This is a more modern version of the tracker supplied as an authentic Xexun unit. It has three bright LEDs on the front that blink continuously like a disco necklace. They're actually quite useful indicators, since they show what the unit is actually doing.

The TK203 watch version by Xexun. My mum happily wears one of these too so we have backup. It's actually very good and has a neat charging cradle that it clips into.
This watch is based on the same software as the big trackers and is easy to use. There are other GPS watches (some of which are terrible), but this one works VERY well.
The back has a seal and is held on by four very fiddly screws, so the SIM and battery are best fitted by someone used to technical stuff. It claims to be resistant to moisture and we've certainly had no problems with that, although the screws on the back rusted!
OK. You've prepared and inserted the SIM and put in a freshly charged battery and made sure the unit is on. Now we want to test it and it's important to note that all GPS (Global Positioning System) trackers need a clear view of the sky to see as many satellites as possible. They will NOT work reliably indoors as the satellite signals are blocked by slate or tile roofs and walls.
Cloudy skies will also affect the accuracy of the units. They provide the most accurate results outdoors on a clear day, but will still provide useful positional information on an overcast day with lower positional accuracy.
The units must be kept clear of metal objects. Anything metal in the direct vicinity will result in much lower sensitivity or even block the satellite signals completely. My mum wears hers on a neck cord with an extra loop so that it always lies flat on her chest with the battery compartment facing in towards her chest.
To test and initialise the unit for the first time of use you can send a text to it that says:-
begin123456
The word "begin" is the command and the numbers are the default password. There is no space between the word and numbers. When you send that as a text there should be a short delay while it tries to find a satellite signal and then it will hopefully return the message "begin OK". If it sends "begin fail" then it may not have been able to pick up the satellite signals properly. This test is best done outdoors with the unit placed in an open area where it can see a lot of sky.
If it doesn't respond at all then there may be a SIM issue or it may not be running. If this is the case then take the battery out and re-insert it and make sure the unit turns on automatically or is turned on with the power button. If the unit is running the recessed (and quite hard to see!) LED should blink occasionally.
If you got the "begin OK" message then it's time to test its location. Phone the unit up and it will ring a couple of times and then hang up on you. After a delay which will depend on how recently it was last used and how strong it's satellite reception is it will send you a text (by default it just sends it back to whatever number called it). On most units the text will initially appear as technical gobbledygook. It will probably look like this:-
lat: 54.328000 long -004.382000
speed: 000.0.01/10/13 07:01 bat:F
signal:F imei:xxxxxxxxxxxxxxx
The first line is the lattitude and longitude and you can search for the location directly by just typing it into the Google search box with the two values separated by a comma. Like this:
54.328000, -004.382000
Google will respond with a small map in its search results which you can then click on to zoom in and out and add layers like satellite imagery to get a good visual indication of the trackers position.
But if you have a smartphone then there's a much easier way incorporated into later software that provides a Google map link directly. To activate this feature send the text message:
smslink123456
That's the command smslink followed by the password (default is 123456) with no space in between.
If the unit has the newer software it will respond with a text message with a direct clickable link to take you to a Google map.
If Android asks if you want to open the link in "Browser" or "Maps" then make sure you select the browser. Do NOT select the maps option as it doesn't seem to transfer the data across correctly and you end up with your last map position every time! When it asks you it will also give a check-box to remember your choice, so tick that and then select "Browser" and it will go there every time.
If you have an older unit that does not accept the smslink command then you can get Apple and Android apps in the app store that are designed to work with these generic TK102 trackers and will detect the text message and open a map automatically, often with other features too. Make sure you read reviews of the apps to see which are best. On Android I used "GPS track" until I discovered that our older trackers did actually accept the smslink command even though it wasn't documented in their instructions!
You may wish to change the password on your tracker as otherwise it's possible that if someone accidentally called its number and recognised the response then they might modify it's settings. It's unlikely, but still a possibility. You MUST make a note of the new password. You can't change some settings or reset the unit without it. Please check your own user manual to ensure the instructions are the same, but on mine to change the password to 333999 you would type the following:- password123456(space)new password like this:-
password123456 333999
Note that there is no space between the word password and the old password, but there IS a space between the old and new passwords. Be very careful when changing the password as you may lock yourself out of the unit. If in doubt, don't do it.
If everything went to plan then you should get the message "password OK" back. Any attempt to use the unit for any function with the wrong password will result in the instruction being sent back to you with the word "fail" after it.
A few notes to remember. The tracker gets it's position by receiving super-accurate time signals from a network of satellites orbiting the earth. It selects the strongest signals and triangulates them by comparing the times which will be affected by the distance from each satellite. On a good day that gives it accuracy to within a metre! Keep in mind that the unit needs to "see" as many satellites as possible, so position it so that it has an unobstructed view of the sky. Behind clothing or in a pocket is fine, but anything conductive like loose change or even parts of the human body will screen the signals. My mum wears hers on a cord round her neck, but we discovered that because she stoops it was better with a longer cord so it hangs lower. A clear sky is ideal, but more typically on a cloudy day the signal will be reduced and the units will give less accurate results or take longer to get them. Sometimes a tracker will just throw out a random location that bears no resemblance to its actual location at all. If in doubt call it again and see how the results compare. Often the second attempt has given the circuitry time to stabilise and you get a better result. The units take up to a minute or so if you call them up and they are in standby, but any calls made in quick succession will result in faster response times as the GPS module remains active for a while.
Trackers work best in open areas. In busy cities with tall buildings they simply can't see many satellites.
Sometimes the units will send a first effort result and then follow it up with a more accurate one. Sometimes they just don't respond at all, or if they just can't get a lock on the satellites they will revert to the last known position and send that despite the fact it could be totally unhelpful.
If the battery is running low and the unit has been called recently it may send a location just to let you know the battery is low and to try and at least get a last location before it goes flat.
Like any other electronic device all GPS trackers have their quirks. Play with them and you'll discover their strengths and weaknesses. It'll give you a greater understanding of them.
From our own experience with our mum we had no issues with getting her to carry the trackers when we gave them to her as "gifts" and she loves to wear them as part of her "possessions". As the Alzheimers took hold she had started wearing her keys on a string round her neck anyway, so the pendant tracker just joined them on its own string. (But kept clear of the keys so they didn't interfere with its signals.)
I hope you found this guide useful. The trackers can do a lot more than I've described above, but I deliberately kept it to the minimum required to get started. It took me a while to work all this out myself, so I thought I'd share the information to help others in the same situation.
Homepage.