MAKE LED COLOUR CHANGING LIGHTS
Make LED colour changing lights. Make LED color changing lights.It's nice to have a bit of colour in your house for style reasons, so here are some neat little PCB's that accommodate a mixture of red, green and blue LEDs giving you the option of controlling the colour they emit. They are designed to fit into standard MR16 downlighter frames for convenience of mounting.
Since this page was put up the intensity of common LEDs has risen dramatically and the price has fallen considerably! Although there are some PCB layout files below, you can also buy the PCBs for a newer version that uses the chunky square superflux LEDs.
If you want to make some of these lights then you will find the PCB layouts and foils below in TIF format. If you view the images directly they will look a bit ragged at the edges. This is because they have been scanned from a laser printed original, but when they are printed at 600DPI the image will be fine. I chose TIF because it carries information that results in printing being done at the correct size.
To print the tif files you should download them to your desktop and use something like paint to open them. It should allow them to be printed in the correct scale. I've added a small section of half inch scale to the controller PCB file on the "make an RGB controller" page to allow you to validate that your printer is producing output of the correct size.
To make a transparency directly, try laser printing the image onto good quality tracing paper and applying it with the printed side against photo sensitive PCB material for exposure in a UV box.

Here are three standard MR16 downlighter frames fitted with LED colour panels. For simplicity and cost reasons I've used just four LED's of each colour, and there are two different layouts of the LED's too. The output intensity is very high but not as high as a halogen lamp, so the lights are best suited to colour wash applications in low ambient lighting conditions. They were too intense for the camera and caused a bit of pixel streaking which interestingly shows as a dotted line due to the pulse width modulation of the LED's.
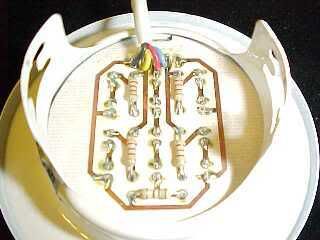
As you can see, the modules are just small round PCB's that sit into the light fittings in the same way as a spotlight would, including the use of the standard retaining spring clip. The LED's are mounted in the normal way, but the resistors are mounted on the solder side of the PCB for neatness. A five way Molex connector can be mounted on the back too if desired.
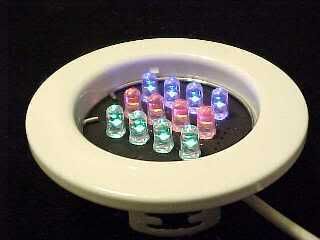
The first module has the LED's mounted in three straight rows. It was designed for simplicity and allows the tracks to be quite chunky which may make life easier if you etch some of these boards yourself. The simple layout also means that the red LED's are mounted as the central stripe since they are a circuit of four in series as opposed to the green and blue which are two pairs of LED's in series. This is due to the forward voltage of the green and blue LED's being higher which means that less can be run in series across a given supply voltage, which in this case is 12V. Because of the layout of the LED's the pinout on the Molex mounting position is slightly different with the red connection in the middle.
Click here for the track and layout of the this PCB in TIF format
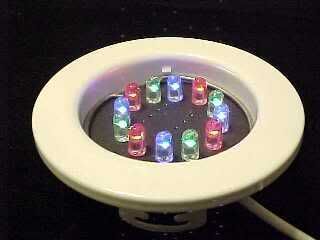
This module has the LED's mounted in a circle, which was no mean feat to accomplish on a single sided board given that there are five series circuits involved. However, it has the advantage over the other style that the multiple positions of the colours reduce the colour-bar effect when an object casts a shadow. (you'll see when you make one) The other option was to add a diffusion filter over the front to combine the colours better, but any diffuser reduces light output.
Click here for the track and layout of this PCB in TIF format
The choice of the LED's is absolutely crucial to the final beam quality and colour purity since mismatched intensities or beam patterns can produce very visible results in the form of visual hot-spots or coloured fringes. This isn't so critical where the light source is diffused.
One of the best LEDs for using without diffusion material is the Agilent POP (Precision Optical Performance) LED. These are designed for use in video walls, so they have a very controlled output that is well matched between all colours. The downside is that they are relatively expensive when purchased in small quantities.
If you use the cheaper LEDs available from some of the ebay sellers then you will probably need to add a slight layer of diffusion filter in front of the LEDs to merge the colours. You should expect the odd failure of a cheap LED here and there, since the cheap Chinese blues and greens are very static sensitive and also rather variable in their manufacturing standards.
That said, the Chinese LEDs really are very cheap so they're ideal for some serious experimenting with colour changing effects.