HACK AN ALKALITE RIPPLE PROJECTOR
This page was originally put up as a temporary gallery entry... I'd just bought a small ripple projector which was quite unusual in that it uses LEDs as it's light source. The packaging boasted quiet operation and cool running with no lamps to change. (The usual LED marketing hype)
The first surprise was just how heavy it was. Most effect lights tend to be quite heavy because of the huge transformer used to power the low voltage lamp, but with this effect being LED based I thought it was going to be as light as a feather.
When I got it home I plugged it in and was met with a loud whining noise from a fan. I wasn't expecting this either. I thought the only noise was going to be the quiet purr of the disk motors.
That was enough! It had to be "modified".

Here's the unit as it normally looks. At the moment it's an Aquadot, but it's about to become a HACKwadot. :)
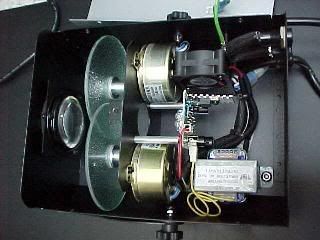
The inside reveals the whining fan and a large transformer. The fan is blowing air onto the heatsink of an LM317 regulator which is driving the LED array.
The 14 LEDs are in two parallel arrays of seven, with the two arrays wired in series and fed with a single resistor. Given the tendency of dying Gallium Nitride LEDs to short out, this is a great way to ensure that you lose half the display and promptly nuke the other half with excess current. The 10V transformer is being rectified and smoothed, which means that it'll end up round about 12V. Given that the LED circuit is dropping about 7V this gives the regulator a fair bit of heat to dissipate and this is probably the main reason for the fan. As the LEDs are being driven hard at 30mA they might get a benefit from the cooling too.
The rippled glass disks are being driven at 1rpm by two heavy duty 230V mains synshronous motors. These are way too heavy duty for the job, but were probably chosen because of their availability and the cost benefits of using a standard component.
They run pretty hot which I prefer electrical stuff not to do.
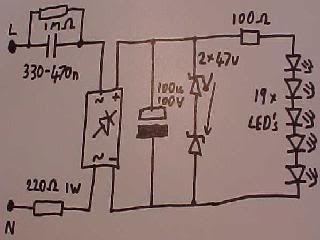
I decide to replace the existing LED panel and power supply with something a little simpler. It's a mains derived power supply using a capacitor as the limiting element. The 220 ohm 1W resistor is to limit any inrush current and transients. The rectifier converts the limited AC to DC and the electrolytic capacitor smooths it a bit. The zeners are there to protect the capacitor from overvoltage should the LED circuit fail. The 100 ohm resistor is just a small current limiter for the LEDs to give the electrolytic capacitor a lift to keep the LEDs lit during the mains zero crossing points.
The LEDs are all in series to maximise the efficiency of the circuit. The components have been chosen to pass roughly 20mA through the LEDs.

These are the prototype circuit boards. There are two types. The first has all the power supply components and LEDs on a single board. It fits directly onto the existing fixings of the original PCB (the green one shown above).
The other design is a seperate PSU board and satellite LED board that is mounted and powered through two long brass spacers. With the PSU mounted on the original boards fixings, the LEDs are located a lot closer to the glass disks, making sure that no light spill gets wasted. There are 19 LEDs on both the new designs. A couple of spare satellite PCBs have been made to allow experimentation with different colours.
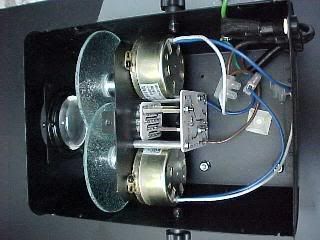
Well that's made a bit of space! :)
The unit is almost empty, virtually silent and weighs less. The LEDs are plentifully bright at 20mA.
Since the motors are so under loaded, I tried wiring them in series to half the voltage across them. They run fine with plenty of spare torque in this manner, and it makes them run COOL.
The power taken by the unit has dropped from about 10W to about 5 which is nice.
Compare this picture with the original one with the transformer and fan.

Could this be art? I decided to make an LED panel with red, green and blue LEDs for some variety. I really like this picture with the LEDs located under the rippled glass.

The effect on the wall is very stylish. The colours mix as they ripple, creating a sort of aurora effect.
Bear in mind that this is not a high intensity lighting unit, but it still manages to get a good bright spread in subdued lighting.